Implementing a Private CA for the Home Lab
The low risk and low-to-no budget of a home lab environment often results in security taking a back seat. Services are sometimes left open and unguarded in the name of “Just Make It Work”. Home labs aside, the complexity of running even a halfway-decent security infrastructure makes doing so a non-starter even in many small business environments.
As a result, the largest and most easily exploitable gap you’re bound to find in many home labs and small networks is unencrypted traffic. This of course allows for a variety of attack methods against locally-hosted services.

Let’s focus on the two most common attacks - sniffing, where a malicious entity with access to your network devices mirrors packets to their own system to inspect the contents; and Man-in-the-Middle (MitM), where the attacker actually intercepts a traffic flow and impersonates the service on the other end.
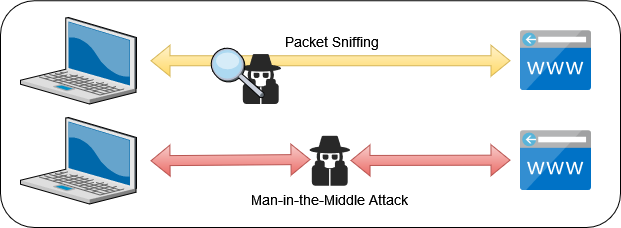
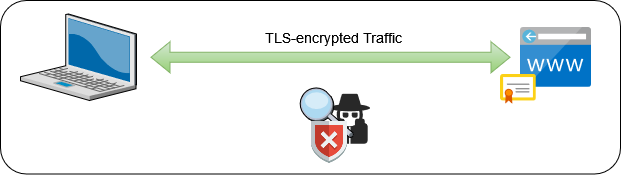
These are two of the most common attacks around because they’re easy to implement and difficult to detect. Fortunately, they are also the easiest to mitigate. First, enforce encryption on the traffic to prevent a sniffing attack; and second, have your services provide a signed certificate to prove that they are who they say they are.
There are almost as many examples available on the web for enabling HTTPS on a web server as there are web servers themselves. Rather than rehash that process, this post will focus on setting up a Public Key Infrastructure (PKI) to facilitate issuing certificates to services on a local network and provide verification and revocation processes to maintain the integrity of your certificate hierarchy.
Step 1 - Create a Root Certificate#
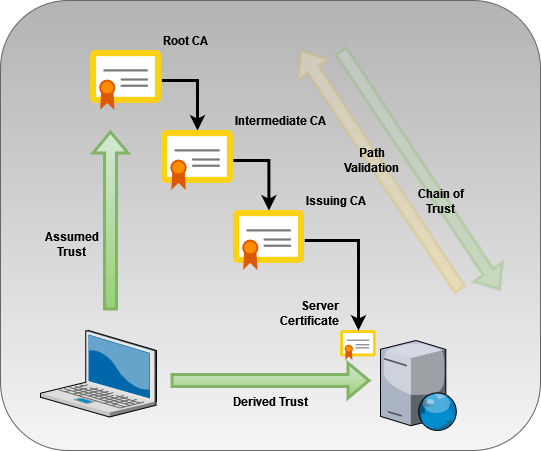
All PKIs start with a single self-signed certificate. Because this certificate sits at the top of the hierarchy, it is called a Root Certification Authority or Root CA. Regardless of the size or scope of an organization, a Root CA is nothing more than a single X.509 certificate and private key. The private key is used to sign other certificates, and the certificate carries a fingerprint that uniquely identifies it as being linked to the private key.
While I could go into great detail showing you how to use the OpenSSL command line to generate all the certificates, that would be a waste of my precious bandwidth. The Google search results for “OpenSSL Root CA” are littered with hundreds of guides written by people much smarter and more eloquent than me. And since working on a command line is a major part of my profession, I’ve come to appreciate a good GUI when one is available.
For creating and managing a Root CA, I encourage you to check out a fantastic multi-platform application called XCA.
XCA handles almost every function of the X.509 certificate lifecycle, including creating private keys, generating certificate requests, and signing requests as a self-signed certificate or using an existing certificate key pair stored in XCA’s database. I use XCA to manage my Root CA certificate and key, both of which are safely stored in an encrypted offline SQLite database.
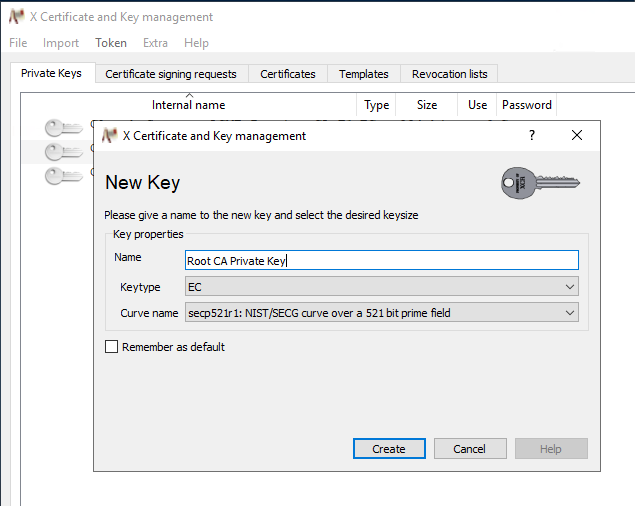
In XCA, I created a private key for my Root CA using the P-521 Elliptic Curve. 521 bits may be absolute overkill for a small home lab environment, but the upside of having a hierarchy is that you will rarely ever be signing things with the Root CA, to the point where the performance impact of choosing P-521 over P-256 is insignificant.
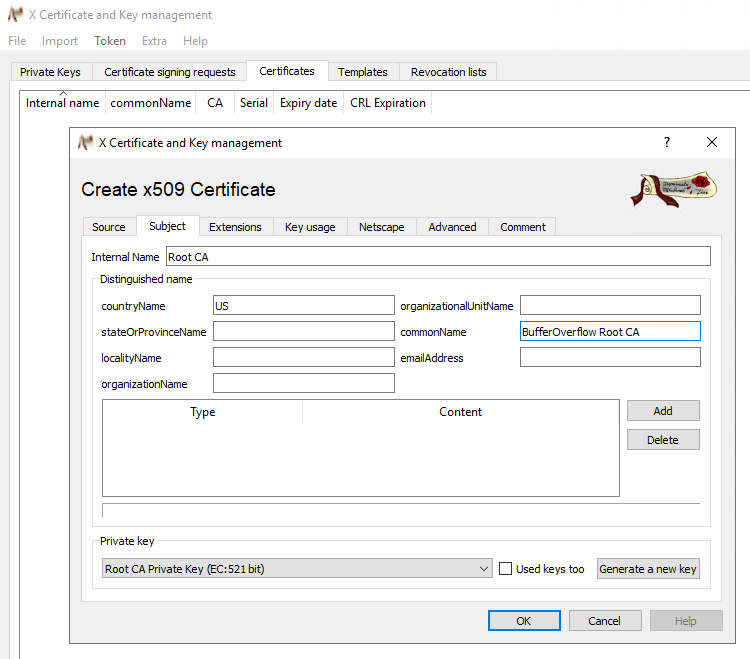
To create the Root CA, we must also create a Certificate Signing Request. The CSR is signed by the private key generated above, and the resulting certificate will carry the private key’s unique fingerprint.
One of the most helpful features of XCA that I’ve come to appreciate is the ability to use templates to generate a certificate signing request. XCA ships with a generic CA template that you can select to generate a functional CA with minimal effort.
On the Subject tab of the Certificate creation wizard, you’re presented with a number of fields that identify who or what the certificate represents. All of these fields are technically optional, but at the very least, you should set a descriptive Common Name to identify your Root CA certificate in browsers and other applications.
On the Extensions tab, you’ll set important details like Path Length and the certificate’s lifespan. Since this is a Root CA, you should select a reasonably long lifetime. Your intermediate certificates will have shorter lifespans because they’ll be used more frequently, and as long as the Root CA is valid, you can always generate another intermediate.

The other fields on this page are not relevant for a Root CA, but will be necessary when creating Intermediates or End Entity certificates if you choose to publish a Certificate Revocation List or OCSP endpoint.
Once you click OK and sign your certificate, you have a functioning Root CA. You can add this certificate to the trusted certificate store on your systems, and any certificate signed by the Root CA will be inherently trusted as well.
Last but not least, do not forget to encrypt your XCA database or export the Root CA certificate and key with a strong password. If you lose the key, you lose the ability to sign anything with the Root CA.
Step 2 - Create an Intermediate CA#
In a typical PKI heirarchy, the Root CA never directly signs an “End Entity” certificate such as a webserver or mTLS client certificate. An Intermediate CA is a certificate that receives its authority from the Root CA, and signs certificates for other subordinate CAs or End Entities directly.
The process to create an Intermediate CA is almost identical to a Root CA, with the following exceptions:
- The Intermediate CA must be signed by the Root CA’s private key, giving it a unique cryptographic signature that can be independently verified against the Root CA’s public certificate.
- The Intermediate CA usually has a much shorter lifespan than the Root CA, typically on the order of 5-10 years. An Intermediate CA will sign a large number of certificates, and should therefore be recycled more frequently.
- The Intermediate CA certificate should list a CRL Distribution Point - a URL where the Root CA’s Certificate Revocation List is published - so clients can confirm that the Root CA has not revoked its signing of the Intermediate CA.
- The Intermediate CA should also manage its own CRL and provide its CRL Distribution Point on all the certificates that it signs.
Because the Intermediate CA will be used much more frequently, its functions are usually handled by purpose-built server software. There are a number of platforms available - and to be honest, this is where I had the most difficulty. Solutions such as Active Directory Certificate Services, PrimeKey EJBCA, and OpenXPKI are popular for large-scale PKI deployments, but that enterprise-ready approach means they’re not well-suited for a minimal deployment, and “ease of use” is sorely lacking.
For seamless integration into my existing AD environment, Active Directory Certificate Services was the most logical choice. Regardless of the platform you choose for your intermediate, the process for signing it from your Root CA is mostly unchanged. You’ll still be able to generate a request, import it into your Root CA’s XCA database to be signed by the Root CA private key, and then export out the generated certificate.
Step 3 - Create an Issuing CA#
With a working Root and Intermediate CA in my chain of trust, I wanted to add one final layer of authority to delegate daily signing responsibilities to. For that, I decided to give Smallstep’s open-source CA software a try.
I originally evaluated Smallstep early on when searching for a product to serve as my Intermediate CA. I didn’t consider Step CA to be a serious contender because of its lack of management features and strong emphasis on automation. What eventually won me over when I evaluated it as a potential Issuing CA was its ease of setup and ACME support out of the box.
Pros
- Simple command-line setup - Smallstep has a number of very useful tutorials, including how to initialize a Step CA as a non-Root authority. For that, you need to create the request using Step and sign it using one of your other certificates.
- Native ACME support - The
step-casoftware can be set up to run as a system daemon, and provides a built-in webserver and API to handle certificate requests from clients. Using the provider functionality, it can also be configured as an ACME server similar to LetsEncrypt. This allows me to have a custom, internal-only ACME CA for my local network! - Step client daemon mode - The
step-casoftware allows any valid certificate to renew itself with the CA - no manual renewal or admin intervention required. ThestepCLI features a “Daemon mode” that can run in the background and automatically renew a given certificate when it gets close to expiration.
Cons
- No GUI - If you like having a web interface to view your certificates, Smallstep does allow linking a single
step-catheir Smallstep cloud service. I didn’t have the greatest experience managing my CA once I did this, because it meant that some settings in thestep-caconfig file were no longer honored and everything had to be managed through their cloud service with OIDC authentication. I rolled the change back and am instead runningstep-castrictly locally. - Highly Opinionated Defaults - The
stepCLI’s certificate request function seems to abstract away a lot of otherwise useful X.509 extensions and features. You can still sign a traditional CSR file using thestep-ca, so I still prefer to generate the key and CSR myself to ensure the resulting certificate works for my needs.
I was very skeptical of Smallstep’s product at first, but once I found the right use case for their solution, I was very impressed with the result. I followed their official tutorials on setting up a new Intermediate CA from an existing Root CA and running step-ca as a daemon and was quickly deploying certificates to several servers on my network.
I even created a template for a systemd unit file to run the step CLI in daemon mode, watching and renewing certificates automatically when they come close to expiring.
The Final Product#
The end result of my home lab PKI experiment looks like this:
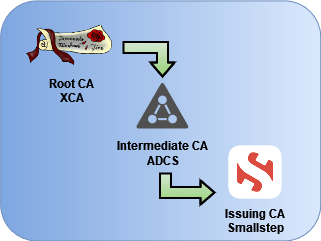
All trust originates with the Root CA, an offline ECC certificate stored in an encrypted database.
The Root CA signs the Intermediate CA managed by Active Directory Certificate Services, which hosts CRLs and an OCSP service for both the Intermediate and Root CA.
The Intermediate CA signs the Smallstep CA, which provides CLI-based certificate enrollment and ACME services for local servers and services.
The Smallstep CA signs dozens of certificates for the various services I run locally, whether issued through the step CLI or through the native ACME API endpoint. With Smallstep’s emphasis on automated issuance and renewals, I’ve been able to achieve unbelievably short certificate lifespans of just 24 hours.
It should be noted that I went through a number of iterations before landing on my current architecture. I spent multiple days researching the array of different PKI products out there, and at least a week wrestling with the setup and configuration of other tools like EJBCA that I ended up scrapping for simplicity’s sake. It’s perfectly acceptable in a small environment to create a two-tiered hierarchy - for instance, cutting out AD and running a CA hierarchy solely comprised of XCA and Smallstep.
In the end, what matters most is that you’ve got at least some foundation to build upon, no matter how simple or complex it may be.